Today API testing has an important role in the software development process. We asked Aleksei Chumagin, a tester with many years of experience in testing API, ML and BigData, to tell us more about the famous Postman tool.
In this article, we will be talking about using Postman for testing APIs. Even though Postman is a popular tool and you probably have used it before, you might still learn something interesting from this.
So, let’s start from the beginning.
TESTING PYRAMID: WHAT WE WANT AND WHAT WE OFTEN HAVE
What we want
As you probably know, in the world of testing, the concept of a “testing pyramid” has been a dominating one for a few years now. Just in case, let us cover what it is.
The testing pyramid is based on the suggestion that all of our automatic tests should be quantitatively divided into the following categories:
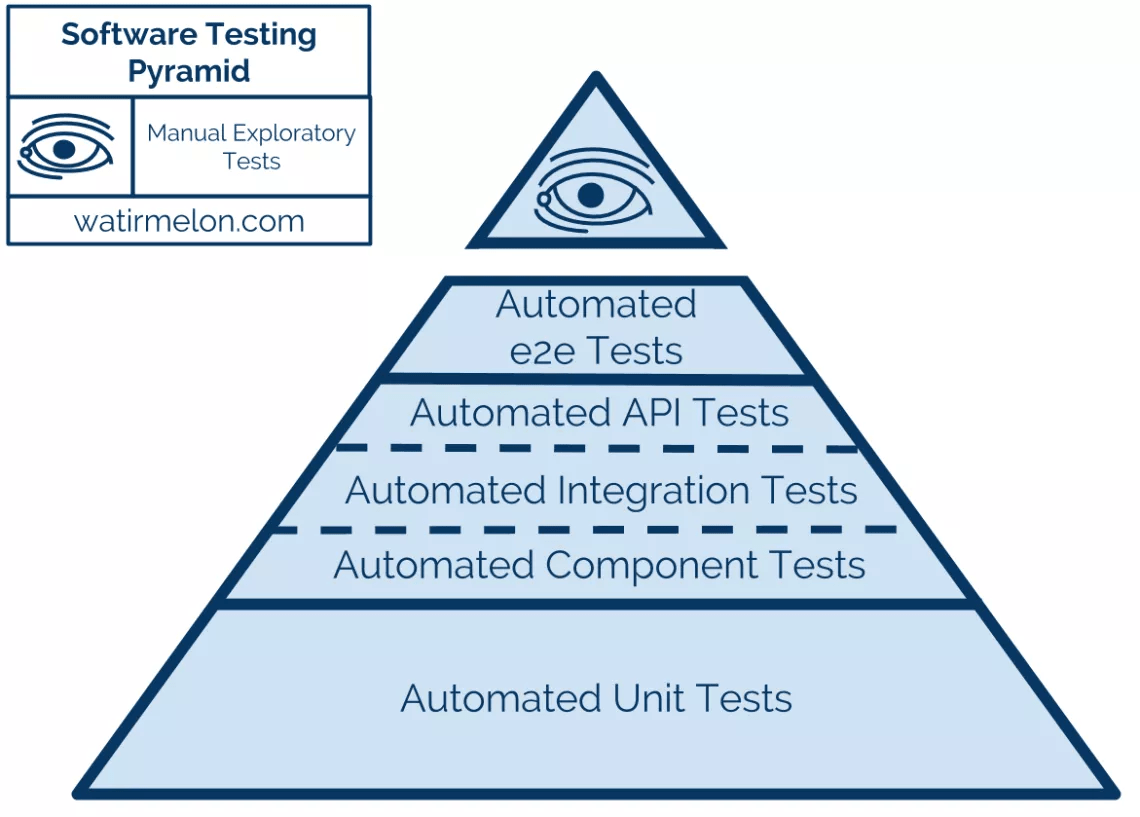
Here are the principles:
1) Testing is thought to be more stable and profitable if the majority of the tests on your project are unit tests. It serves as a foundation for your project testing.
Why should there be so many unit tests? Because they are quick, the easiest to maintain and, most importantly, they are the most stable.
2) The next level, generally, would be called integration tests, but here they are given in a little more detailed way. This level also includes API testing. So, if you have an API in your project, then the number of tests for the API should be a little smaller than for unit tests. Why? Because those tests take more time, they are less stable, and they may require some third-party requests.
3) The least amount of tests in this pyramid is designated to end-to-end tests. This would be UI tests that interact with the browser and that (for managers) “test as humans”. In reality, these tests are the least stable, the slowest, and the most difficult to maintain. If you have ever worked with automated testing, you most likely know what it is like to support a framework for UI tests.
4) The “eye” on top of the pyramid represents manual testing. It is expected, nowadays, that all manual tests are exploratory tests – so you are not going through a list of tests but rather creating tests on the fly, as you are going through your app.
With these tests, one does not create cases in advance, instead they make up so-called “tours”, or “missions” to follow. A good analogy would be computer games, where you have the primary mission, but you can do some secondary ones as well. It’s the same in exploratory testing – you have your main features to check, and if you can take a turn here or there, all the better.
A good example would be a task to find all of the error messages in the app – that would be a tour or a mission. And while searching for all the error messages, you might find some bugs as well.
What we often have and how to help it
Often, this pyramid turns into an ice-cream cone: most of your tests are manual, almost the same amount are end-to-end UI tests, with just a little bit of unit tests.
So, if you have way too many UI tests, you need to move one level down and test the API.
The first thing that comes to mind when we think about APIs is to take some programming language like Python, get its “request” package, and start writing tests. That is great for people who know how to code. For others who do not, I suggest using tools that would help you to test the API. There are lots of those – some are better and some are worse, but maybe one of the best-known is Postman.
WHY POSTMAN IS GREAT
Main features for testing
Postman is an excellent tool for sending requests to your API, receiving responses, and analysing them. Also, Postman can combine your requests into groups or Collections, building a structure. With that structure, you are not only testing but also documenting your application.
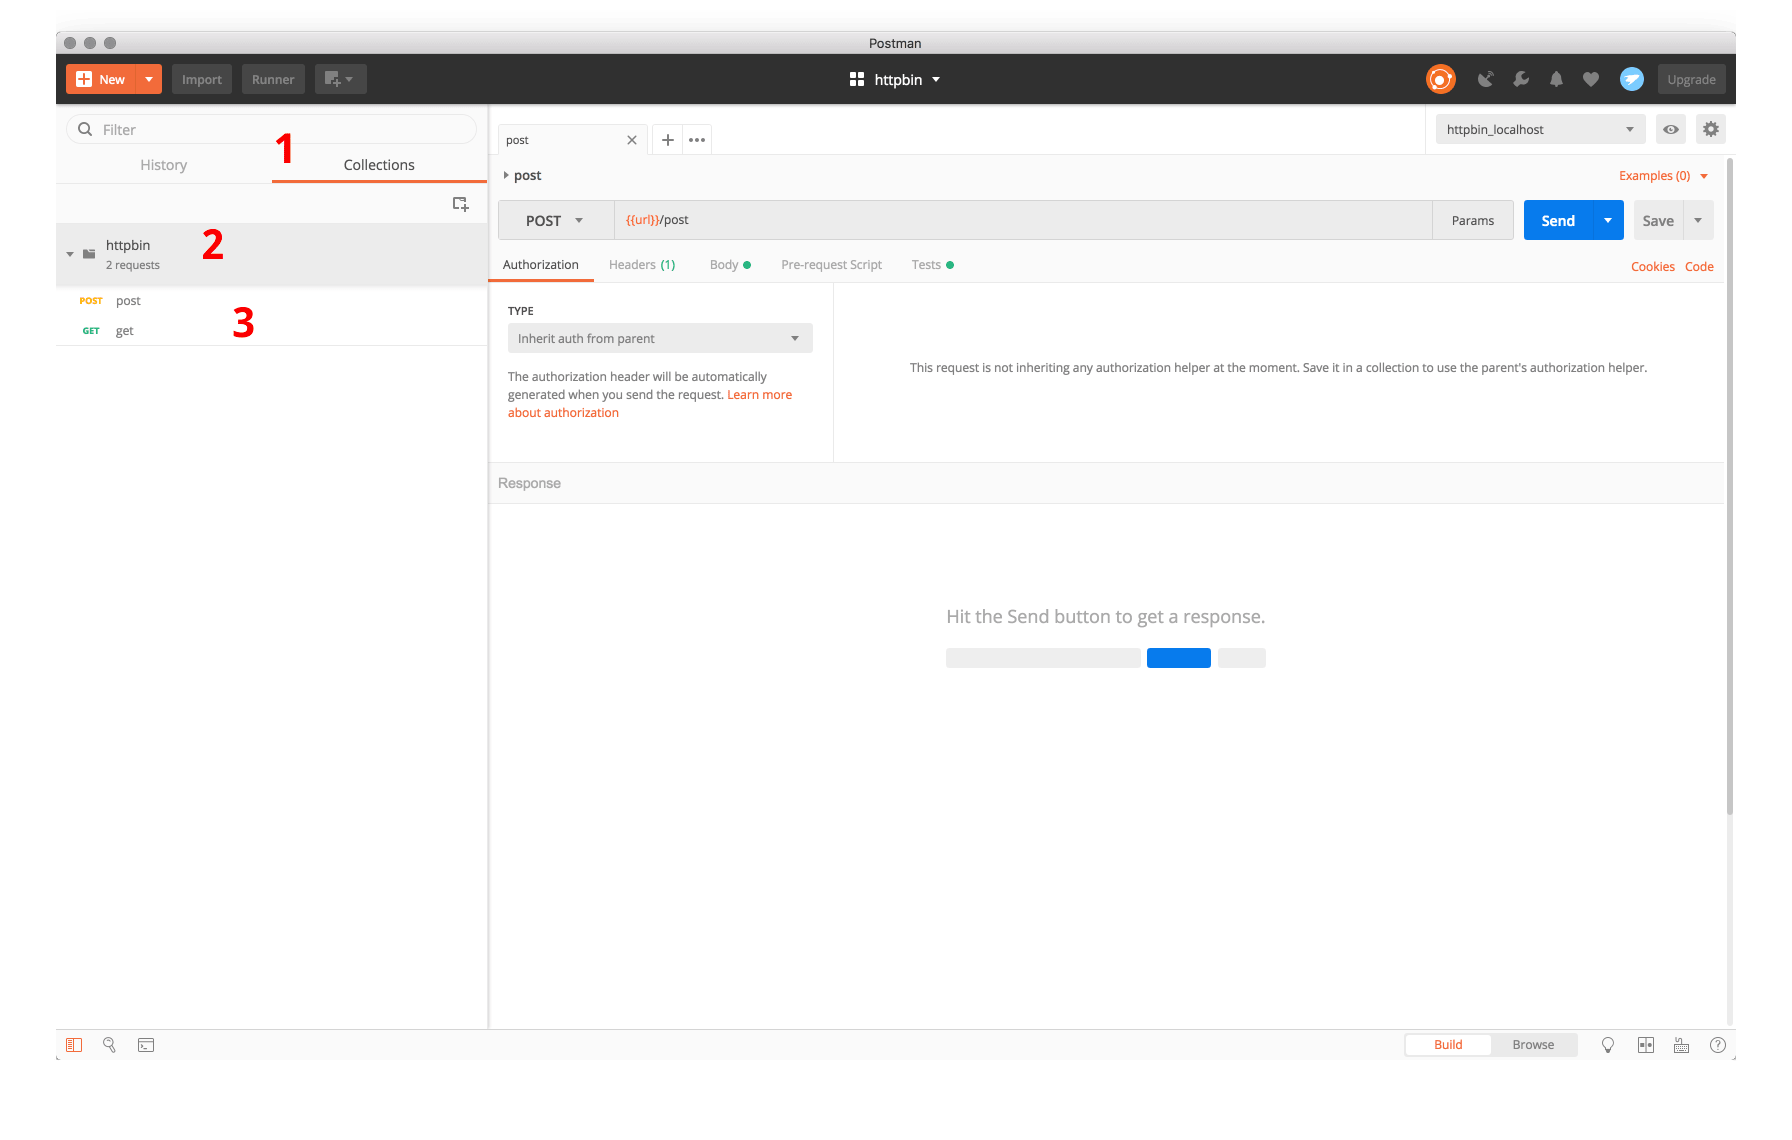
So, the main screen of Postman looks like this. Collections would be located on the left – as folders storing your requests:
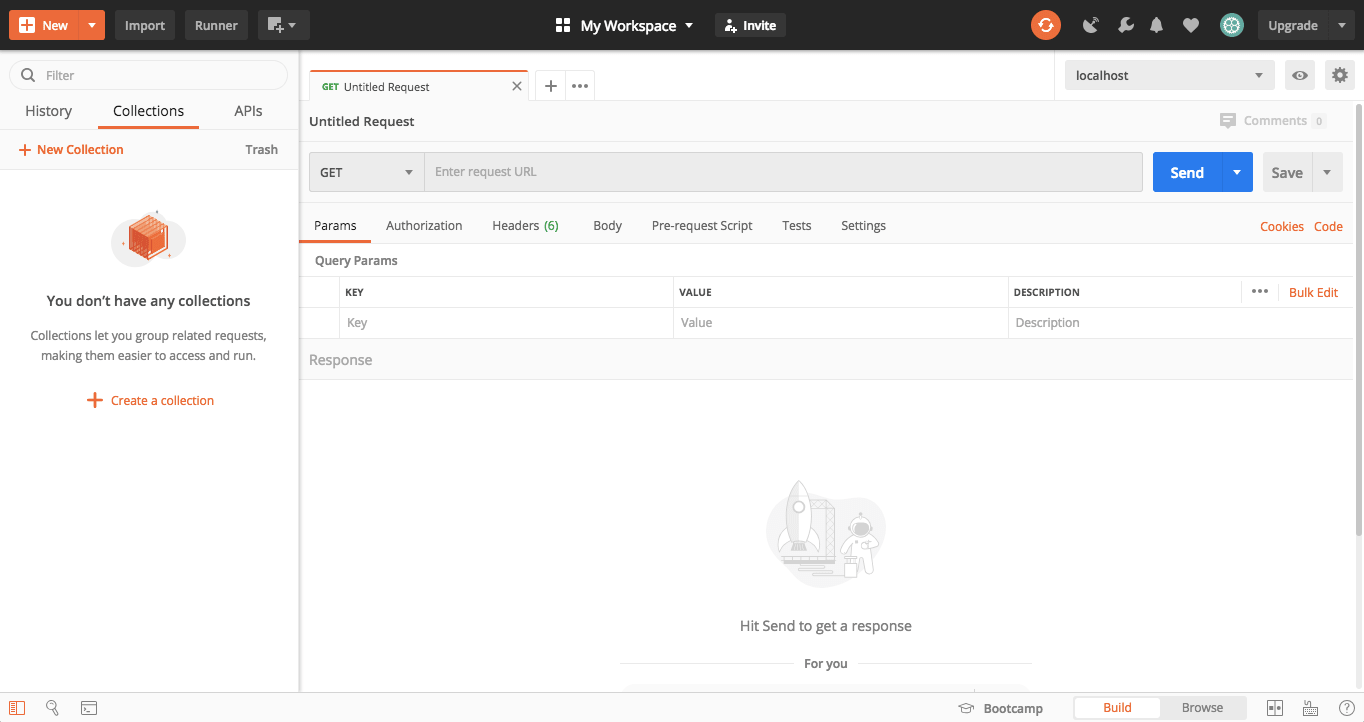
In the middle, there is the main element of the interface – your actual requests and a “Send” button”. You just type in your request and send it, receive a response, do something with it, and move forward.
Although its interface is simple, Postman has some rather sophisticated features, like allowing you to make requests before your requests – for example, to set up something or go through authorisation. You authorise in a pre-request and then make a request about, say, the number of users – you can do it all in one go.
You also have a “post-request” – it is an action that you take after your request – for example, you checked that your status is 200 and that you received some value from the server. These requests have a straight execution order – they start with a pre-request followed by a request and, when we receive a response, we can do something with it using the post-request (all together this is called a test script):

Now, let us take a look at a more complicated situation. When you have many tests (each request is, essentially, a test), for example it would be unwise to perform authorisation before each and every one of them. It makes more sense to do that before all of the requests and then execute them as an authorised user. So, Postman allows you to not only send pre-requests on the level of a single request but also a folder, collection, and environment levels as well:
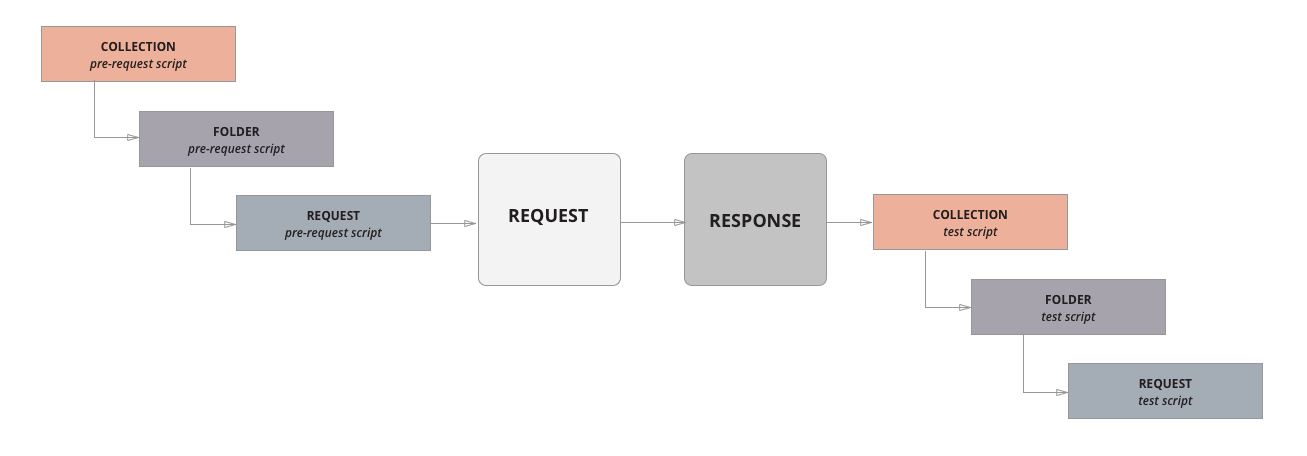
You can write your pre-request for the whole collection, then a pre-request for a single request – and also make some multi-level post-requests.
A good example: to begin with, you would like to make sure that all of the tests in your collection return 200 – you do not need to send this check for each test, but create only one for the whole collection to get it done.
Variables
It gets more complicated when we talk about authorisation. Here we need to take care of things like cookies – to take them from one request and somehow distribute them among the others. For that, Postman also has a handy feature – variables . You can use variables to pass values from one request to another, or one collection into another. They also have a hierarchy:
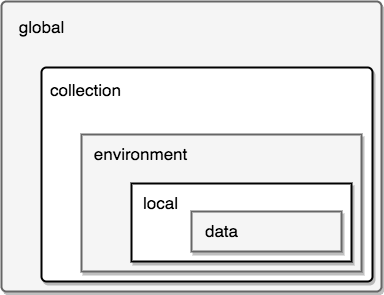
Global variables: apply to all levels – collections, folders, and single requests – those are good for authorisation;
Collection level variables: if you have several collections, you can use variables for only some of them;
Environment level variables: the one you will use the most. For example, it would help if you want to execute a test on both production and development branches – they will have different URLs which you can state at the environment level. So, when you switch the environment, the URL will change accordingly (there will be examples below);
Local variables: work when you set something within one request (or one response);
Data level variables: when you use the data for starting your tests (we will not be talking much about that here, but let me know in the comments if you are interested in those).
HOW IT WORKS
Now, let’s go through how to use all of these Postman API testing features.
SUT
For this example, I will be using the httpbin platform – a service that can receive requests and, depending on the request type or permissions, returns different results. If we send a GET request right within the browser, we will receive a JSON with headers, IP, URL:
    {
   	"args":{

   	},
   	"headers":{
          "Accept":"text/html,application/xhtml+xml,application/xml;q=0.9,image/webp,image/apng,*/*;q=0.8,application/signed-exchange;v=b3;q=0.9",
          "Accept-Encoding":"gzip, deflate, br",
          "Accept-Language":"en-GB,en;q=0.9,ru;q=0.8,ru-RU;q=0.7,he-IL;q=0.6,he;q=0.5,fr-FR;q=0.4,fr;q=0.3,en-US;q=0.2",
      	"Host":"httpbin.org",
          "Sec-Fetch-Dest":"document",
          "Sec-Fetch-Mode":"navigate",
          "Sec-Fetch-Site":"none",
          "Sec-Fetch-User":"?1",
          "Upgrade-Insecure-Requests":"1",
          "User-Agent":"Mozilla/5.0 (Macintosh; Intel Mac OS X 10_13_6) AppleWebKit/537.36 (KHTML, like Gecko) Chrome/80.0.3987.149 Safari/537.36",
          "X-Amzn-Trace-Id":"Root=1-5e84ca34-b55801fc5b9587c0efe30d20"
   	},
       "origin":"188.234.36.53",
       "url":"https://httpbin.org/get"
    }
If we pass a value as a parameter, we will see that value in the response:
   {
   	"args":{
"data":"10"
   	},
   	"headers":{
          "Accept":"text/html,application/xhtml+xml,application/xml;q=0.9,image/webp,image/apng,*/*;q=0.8,application/signed-exchange;v=b3;q=0.9",
          "Accept-Encoding":"gzip, deflate, br",
          "Accept-Language":"en-GB,en;q=0.9,ru;q=0.8,ru-RU;q=0.7,he-IL;q=0.6,he;q=0.5,fr-FR;q=0.4,fr;q=0.3,en-US;q=0.2",
          "Host":"httpbin.org",
          "Sec-Fetch-Dest":"document",
          "Sec-Fetch-Mode":"navigate",
          "Sec-Fetch-Site":"none",
          "Sec-Fetch-User":"?1",
          "Upgrade-Insecure-Requests":"1",
          "User-Agent":"Mozilla/5.0 (Macintosh; Intel Mac OS X 10_13_6) AppleWebKit/537.36 (KHTML, like Gecko) Chrome/80.0.3987.149 Safari/537.36",
          "X-Amzn-Trace-Id":"Root=1-5e84cb32-b3eae4303b3322a08f2715c8"
   	},
       "origin":"188.234.36.53",
       "url":"https://httpbin.org/get?data=10"
     }
Now, let us move this to Postman.
Postman: Basic interface
Now, let us see what it really looks like.
Remember, on the left, we have our collections tab(1), a single collection(2) and single methods in that collection(3):
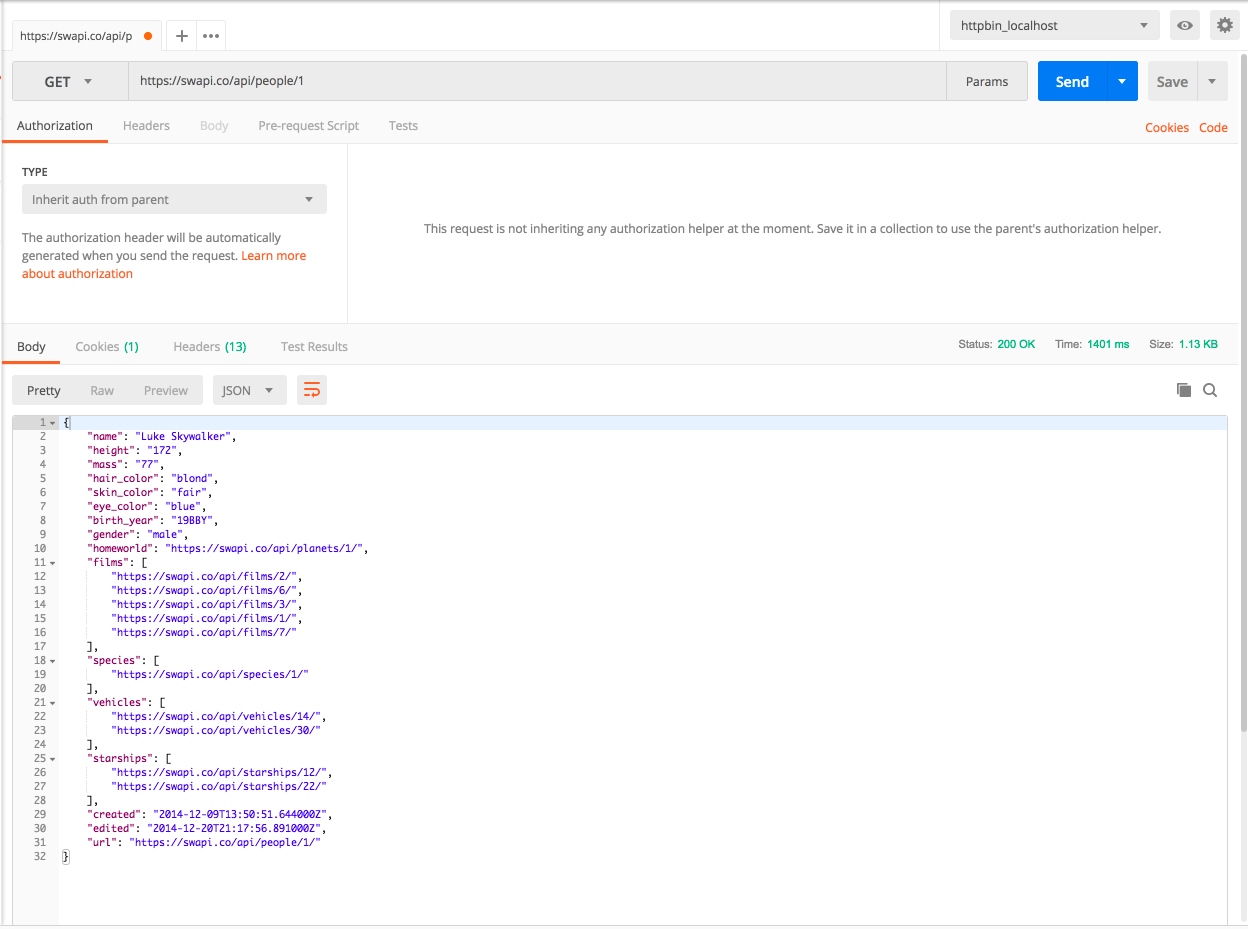
In the middle, there is a tab with the request and a little below – place where the response will be available to you to analyse:
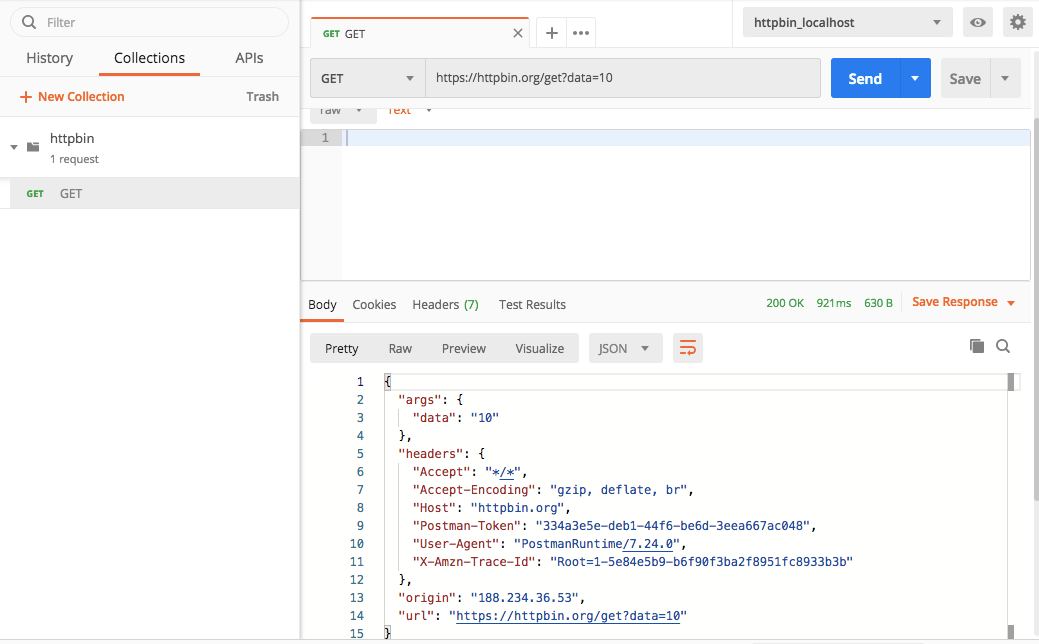
All the new elements are created using the “New” button. We will create a collection, add our request to it, save, and send it. We will receive the same response – with the status, time, size, and the body of the request:
Case 1: Using test scripts and environment variables
Objective: to make sure that our request returns a status of 200 and has a specific parameter in the response (a value that equals 10), in different environments.
It’s great to send requests and see the responses but let us assume that we have a requirement that some URL must always return status “200” as well as some other parameters. Looking it up manually each time is not efficient – as testers, we want these checks to be automatic.
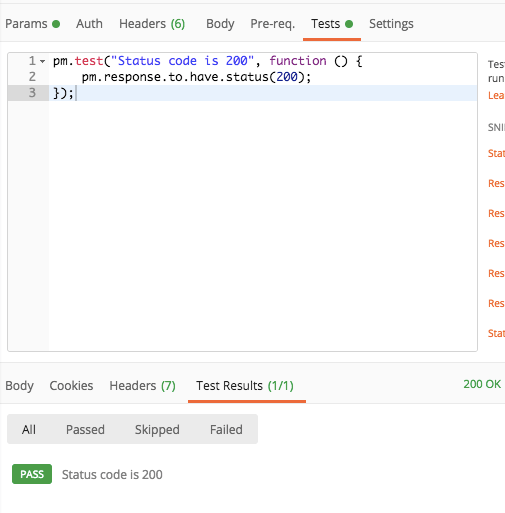
Now, remember I mentioned that we could do things after we received the results of the request? These actions are called “Tests”, and we can write tests for each of our responses. Those tests in Postman are written in JavaScript and are located here:

To avoid manual coding, we can use pre-set scripts that the Postman team prepared for us, called snippets (you can see the list to the right of the tests):

Here it is – “Status Code: Code is 200“. We click on it, and we have a new test. If we now send a request, we will see that after execution it is now in the “Pass” status below, in the “Test Results” tab:
We have created our first automated test!
Now, let’s add something more interesting. Remember, that we need to make sure that the response JSON stores a certain value – 10. For that, we choose “Response body: JSON value check” – we only need to change the name to “Response has 10”, and because the value is represented by the parameter args that stores data, we set that too. And, of course, make it equal to 10:
Initial snippet:
pm.test("Your test name", function () {
    	var jsonData = pm.response.json();
    	pm.expect(jsonData.value).to.eql(100);
    });
Our test checking for the value:
  pm.test("Response has 10", function () {
    	var jsonData = pm.response.json();
        pm.expect(jsonData.args.data).to.eql("10");
    });
That way, we created a request and added 2 checks to it.
Usually, we want to test things in different environments. And it is easy to do with environment variables. So, if we do not want to type, say, an exact URL in the request but a variable, we can simply add it as an environment variable by clicking on the cog icon:
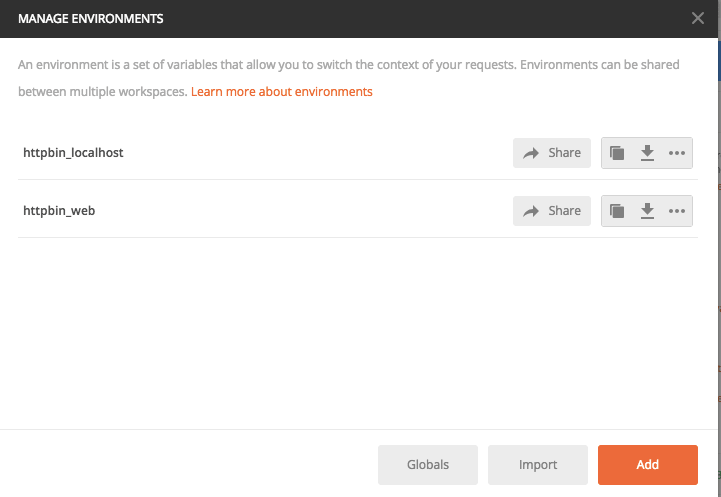
We can use it by writing the key in double curly brackets, here – {{url}}:

Now, to switch environments, you only need to choose one from the list.
Case 2: Pre-requests and global variables
Objective: put a changing value into each request, test for a changing value
Now, let us assume that we do not have a constant value, but some ever-changing parameter. For this example, we will ask httpbin to provide us with a uuid using this request.
That will help us make our task more complicated:
1. We need to ask for a uuid; 2. Get that uuid; 3. Put it into the request as a parameter.
That is an example of how pre-requests can be used.
Pre-requests, as well as Tests, have pre-set snippets with the most common features already coded for you. Here it would be “Send a request”:
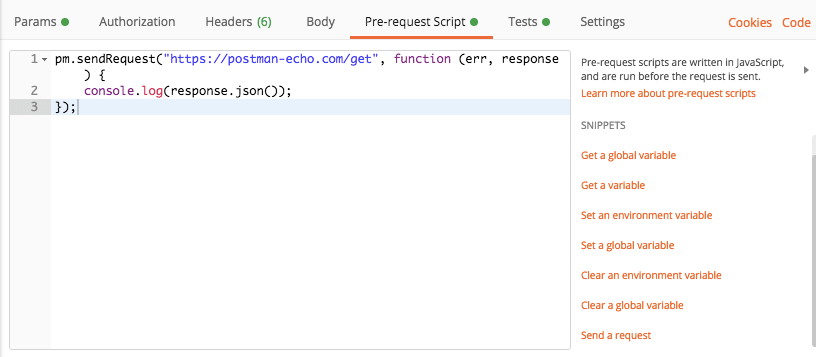
To make it work in our case, we also need to use an environment variable in the body of the request – and we cannot do that merely using braces. But we can use the “Get an environment variable” snippet. Those two together will give us code that will send a request for getting an environment variable (by also changing the parameters to fit our needs).
And the third one – “Set a global variable” – will help us save our result into a global variable, accessible from any environment.
So combining and altering the original snippets:
    pm.sendRequest("https://postman-echo.com/get", function (err, response) {
        console.log(response.json());
    });
+
pm.environment.get("variable_key");
+
pm.globals.set("variable_key", "variable_value");
Will give us our pre-request:
    pm.sendRequest(pm.environment.get('url')+'/uuid', function (err, response) {
        pm.globals.set("uuid", response.json().uuid);
    });
We also should not forget to update the Request URL according to our new requirements and allow our global variable uuid to be accessed:

Now, as we are done with the pre-request, it is time to look at our two tests from the previous case: one that checks the status and another one checking if the value is equal to 10. As the value is no longer a static number, it is time for us to fix that test. Now we will only ask the test to check if there is some variable called “uuid” within the response.
    pm.test("response has a " + pm.globals.get("uuid"), function () {
        var jsonData = pm.response.json();
        pm.expect(jsonData.args.data).to.eql(pm.globals.get("uuid"));
    });
RUNNING TESTS IN COLLECTIONS
Postman Collection Runner
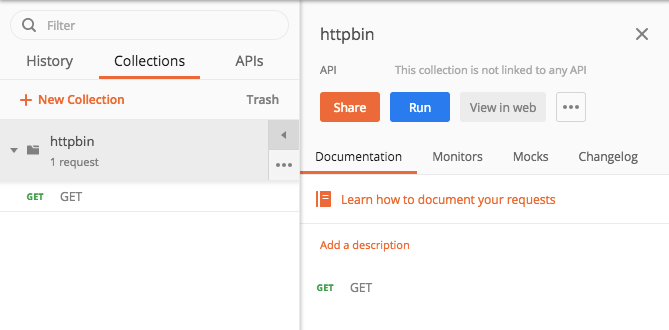
After clicking “Run”, you can choose:
– The collection to run; – The environment; – Number of iterations; – Delay – how long Postman should wait before sending the next request (for example, in cases when you do not want to overload the system); – What responses will be logged; – For data-driven tests – a file to take data from. Postman will parse the CSV automatically, based on the table names
If a test fails, you can find the “Postman Console” in the bottom left corner of Postman, and check what might be wrong.
Newman: CLI for Postman
Even though Postman is a great solution, most of us would like the tests to be fully automatic. For example, to test everything during CI and receive a good-looking report. This is also possible in Postman!
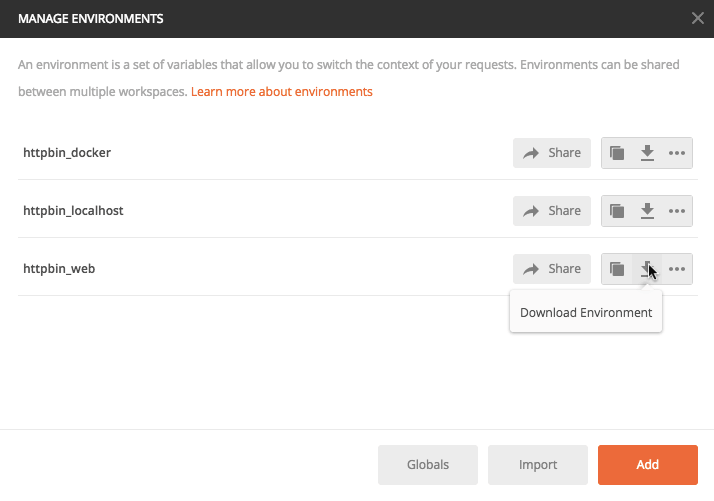
Postman has an additional program called Newman – it is, essentially, a console version of Postman. To execute our tests on Newman, we need to export our collection:
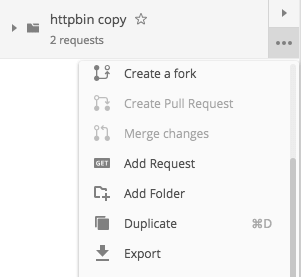
And our environmental variables:
Now, we need to start httpbin and Newman – they can be executed in Docker by running
docker-compose up
from the folder containing the following .yml file and our exported collection and environment variables:
    version: "3"
    services:
      newman:
        image: postman/newman_ubuntu1404
        volumes:
          - "./:/etc/newman"
        entrypoint: /bin/bash
        stdin_open: true
        tty: true

      httpbin:
        image: kennethreitz/httpbin
        ports:
          - "80:80"
When the containers are created, execute the container that was created for Newman in a new window:
docker exec -it *put the name of your newman container here* bash
Now, as we are inside the container, we can run our collection with one of our environment variables:
newman run httpbin.postman_collection.json -e httpbin_docker.postman_environment.json
or
newman run httpbin.postman_collection.json -e httpbin_web.postman_environment.json
where -e determines the environment.
Tests are executed, and here is the report:
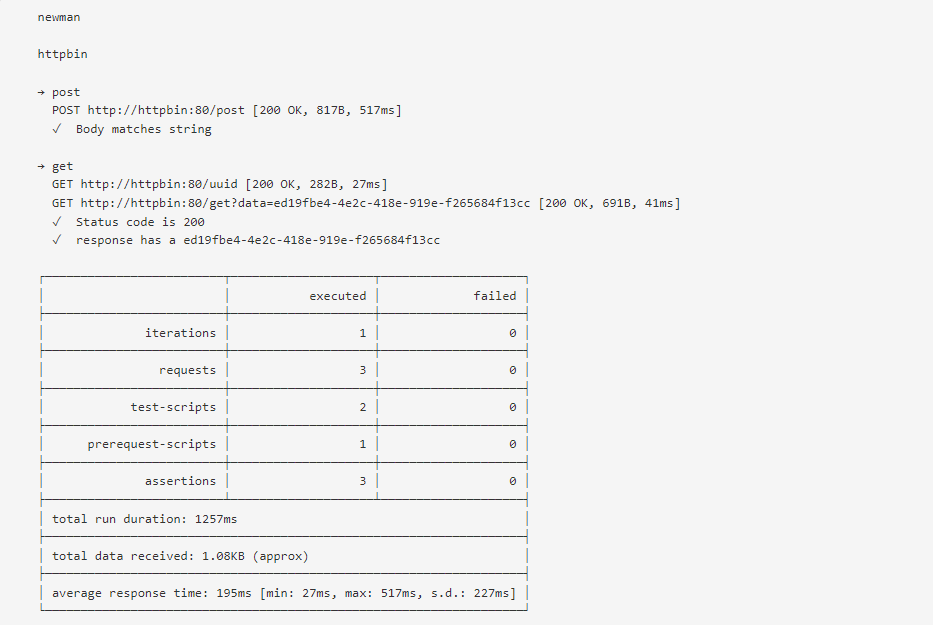
We can also run our tests several times by using -n 10 (number of iterations), and if you need a report, you can export the results using -r html – that will create a file in the same folder as your variables.
For better-looking Allure reports, it is possible to export the report into JUnit instead of HTML and then, using Allure’s adapter, transform it into a format that Allure understands.
After deploying Newman using Docker, you can easily connect it to Jenkins and set up your automatic requests – and become a real automation testing engineer!
CONCLUSION
When we talk about Postman, we tend to focus on its strengths, but it would be unfair to omit its disadvantages.
The ones I see:
– Being restricted by the nature of the tool. For example, you cannot directly access a database from Postman or access a local file. It is possible to solve this, though, by writing an additional API that will be accessing a database or local files. You will need automation skills for that, but again – it is important to improve your skills and strive for self-improvement; – If we look at the format in which Postman stores collections and requests, we’ll see JSON that makes reviews of the tests or collaborative work on tests, for that matter, impossible. If you want these requests to be in any other format, you will need to re-export them via Postman; – Another thing that I have never personally encountered, is that when you have too many requests (thousands), Postman becomes very slow. But I believe that when there are, say, 10 000 requests, it is efficient to learn how to write tests using a programming language.
Overall, Postman seems to be a great tool to start testing APIs right away with instant results.